Where it all Started...
- Evert Loo
- Nov 11, 2019
- 10 min read

Updated: May 30, 2022

First...... Little bit of where and how it all started.
When I was still at school, standard 8 or 9, I received a few things from my Grandfather.
He used to have HO and N Gauge when my mom was still little.
He gave me a Atlas Diesel, , with two freight wagons as well as a Minitrix Electrical Loco, , also with 2 passenger wagons. Some other scenery bits and pieces as well as a house and tow mountain cabins. There was also one set of workers. And together with this was a H&M single Transformer, It still works today.
My grandfather and myself went in to Cape Town one day with the Train and bought a few lengths of Peco track as well as a left and a right point.
Like a boy I wanted to play now, but space was a bit of a problem so I just ran the train up and down on the length of track.
Then it was school again, so it was all packed away, collage and it just stayed packed away.
When I started to work I decided to build something that can fit under my bed, but never got any further that the benchwork.
Then my grandfather got sick and he passed away.
I told my mom, I have to do something now and in August 2011 the hobby really started for me. And I never looked back..... My grandfather would have been so proud to see me now.
Design:
“The start of a awesome journey”
I used AutoCad to draw and design the layout. I wanted to run my grandfather’s trains so I had to design it in such a way that I could operate both Analog (DC) and DCC (computer chip trains). I decided on an oval for the DC, and inside that another oval for the DCC. To make it a bit more interesting, I added a figure eight on the inside of that. With a bit of thinking, I linked everything together to make it work well.
I wanted it to be portable as I started the build in the attic of my parents house. I kept the layout to the size of a single door (2000mmx820mm) 78.74x32.2inch.
Build:
The frame of the bench work I built with 92mm x 22mm (3.6x0.86inch) Pine and added 22mm x 22mm (0.86x0.86inch) battens on the inside to make it stronger, but still fairly light.
On top of that I glued 20mm (0.78inch) sheet foam (Styrofoam) so that I had a base to work on.
I then cut out the footprint of the track in sections using 20mm (0.78inch) sheet foam (Styrofoam). I used Woodland Scenics 2% inclines from the sub terrain layout system to get to the heights I required for the two bridges.
Once all the base work was done, I could start with the track work. I used flex track Code 80 from Peco. All the points are also from Peco (electrofrog) with SEEP point motors. I also did all the wiring so that I could operate a train. I was quite impressed; it was starting to come together nicely.
Landscaping Design and Build:
“Be original, show off your style, and tell your story.”
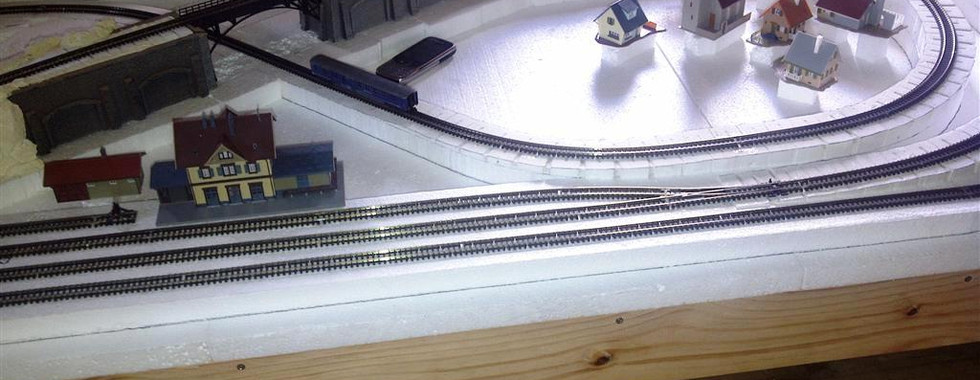
I knew from the start that I wanted a mountain on the one side, my town would go in the loop of the eight. The Station would be in the middle front. Now I need to make this all work.
I once again used 20mm (0.78inch) sheet foam (Styrofoam) and cut out the profile of the mountain. I build it as ribs which I connected to each other with small flat sections of foam. To give it a strong base I saw that Woodland Scenics has a plaster cloth so I decided to make my own. I bought a roll of cloth bandage at the pharmacy and cut it in about 200mm (7.8inch) lengths. Then in place of plaster or hydrocal, I used cretestone. I made up a very watery mixture of cretestone and soaked the pieces of cloth bandage in it. Then I laid the pieces of cloth randomly over the foam structure.
I also made my own rocks, I bought the Woodland Scenics rubber moulds and with the cretestone mixture I cast my own. As for painting, I mixed three different colour browns to my liking and the darkest (very runny) I painted as the base colour. I let the excess of paint run down to create darker parts. I dry brushed the two lighter browns over that to create a realistic look. For the field or grass sections I painted a thick layer of earthy coloured paint, and while it was still wet, I sprinkled the Woodland Scenics grass over it. I then used the Woodland Scenics cement in a spray can to glue the grass onto the layout and give it a realistic matt finish. The waterfall and river was also created with the Woodland Scenics Water Effects and Realistic Water. All the trees and bushes are from the Woodland Scenics range..
Buildings Town and Other
I bought the Station first (Faller 212107 Guglingen). Then I started to look for houses and other buildings to create the town. I did not want to recreate a specific place, so I bought whatever I liked. The placement of the town houses and church (Faller 232220 - Village Set) on my layout is similar to the display picture on the packaging. I liked it so I tried to replicate it on my layout. I also wanted to add a windmill (Model Power #1578 including motor) as both my parents were born in Holland. The cars and people are mostly also all from the Woodland Scenics range. Houses are fitted with LED lights and the street lights are from the Viessmann range (Park Lamp Black VIE6470)


Extra Detail and Maintenance
I like to do detail, so there are lots of small little details on the layout that make it interesting to look at. Even I can sit for hours and just watch while my trains pass through my layout. Currently I’m busy finishing the catenary from Vollmer, I bought two starter kits. (Vollmer 8040 and 8041) I’m also still busy adding the powerlines to the houses. Then there is always a tree or a bush somewhere or just a little bit of paint that can be added to just finish it off better, or to make it look a little bit more realistic

Step 1: Building the BaseBoard


I used 92mm x 22mm Pine for the frame and 22mm x 22mm Pine for the bracing. Everything is glued and screwed together. Then on top of that I glued 20mm Styrofoam sheets. The shape of where all the track will go I have cut out with a hot wire cutter which I made myself. This I glued on top of the full sheet and it gave me a easy way to lay the track in the correct place.
Step 2: Laying the Track and Adding the Power


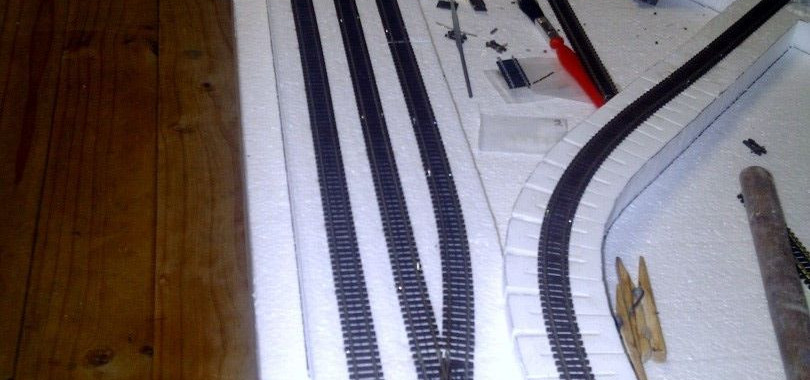


Once I had the shape for the track it was time to lay the track. Track was glued to the Styrofoam and all wiring done and properly tested before any mountains and tunnels were built.
I installed a heavy gauge wire to carry the Main Power and thin feeder wires from the track to a connector block and on to the Main Power
I soldered the wire (red and black) on to the out side of the track.
I wired the layout in such a way so that I can run DC and DCC at the same time or everything the one or the other.
DC = +- power with transformer, so, more power faster the train, switch the polarity and train will reverse.
DCC = 12-16V on the track permanently. Locomotives have a Computer chip (decoder) inside and is given a number. The controller talks to the number and control the train that way.
After 3 years of running trains on the layout in 2015 I decided to make some track changes to the Station.
I have changed the way the track was configured in front of the station, to give me more shunting and play opportunities. I had to keep in mind that I will still run DC as well as DCC on the layout, so certain sections was isolated.


Step 3: Starting With the Landscape


Decided to start with the mountain.
Used the same Styrofoam as I used for the base to cut "ribs" for the mountain. I roughly drew a shape and then cut it out. Used some off cuts pieces to connect everything.
Plaster cloth is quite expensive, so I decided to make my own. I bought a few rolls of cloth band-aid and I bought some Creatstone (same idea as plaster of paris, just half the price). I mixed the Creatstone to a sloppy consistency and wet the cloth. Then I soaked the cloth in the mixture and layed it randomly over the mountain structure.
I bought some rock-molds from WoodlandScenics and casted my own rocks and build them onto the layout.
I think this is the part of building I like the most :)
I decided to finish all the building before I paint or do any detail
Step 4: Building the Houses and Other Buildings For the Town


I finally received the bridge for the last piece of track. Then I also built all the buildings, mostly Faller kits, I had for the layout. I placed the buildings where I wanted them and cut footprints for each building out of cardboard. This I glued on to the Styrofoam. For the town area I wanted to create some height, so I first glues in some spacers and I filled all the open areas with expansion foam. Then I cut and sanded everything till I was happy with the look of everything. I also added lights 5mm LED Lights, painted brown to display a yellow colour light.
Step 5: Painting and Adding of Scenery


I decided to finish all the building of the landscape before I started with the painting of the rocks and other details.
I used 3 colours for the rocks. Dark grey (wash), Reddish brown and a Mustardy brown. I started with the wash, very thin watery paint. This will run in all the crevices and will give a nice textured look. I did 2 layers of this where needed. Then I lightly brushed the Reddish brown and finally just for highlights I did the Mustardy brown. For ground cover, earth I used a medium brown paint. This I just liberally painted over everything where grass, weeds, trees and anything else will go. For grass I used the WoodlandScenics Ground Cover. I used a few different ones, Earth Blend (brownish), Green Blend, Burnt Grass Blend and Weeds Blend. This give quite a nice realistic effect.
After about 8 - 10 years of running the layout and carting the layout to Shows, the scenery became dull and dusty, so there is always maintenance work to be done. I always add more detail, bushes, grass, stones....... I recently bought the WoodlandScenins Static King grass applicator. Awesome Product !!!
So I'm busy updating the layout once again :)
I also added some Snow on the Mountain, just for an ekstra effect.


Step 6: Adding the River and a Waterfall


I wanted to have a river on my layout, then my dad suggested that I build a small little spring and have a Waterfall from there into the River. Easier said than done..... So I build it all and bought the realistic water from WoodlandScenics. Painted the river and poured in the water.
First pour was a mess, it looked awesome after the pour, but the next morning the Realistic Water ran out through the porous polystyrene. Then I bought more and pour again.... Disaster again !!! The water reacted with the Styrofoam so I had to demolish everything and start over. Layered the river again with Creatstone and then sealed it with resin. Then I paint again and then water. Success !!!!! I built the Waterfall from the Water effects also from WoodlandScenics. Quite happy with the outcome.
Like with the other scenery, the water went dull and dusty and I could not clean it so it look like water anymore, so I poured in a thin new layer of resin and added WoodlandScenics Water effects when it was dry. Created ripples and a new waterfall...... Came out extremely well.


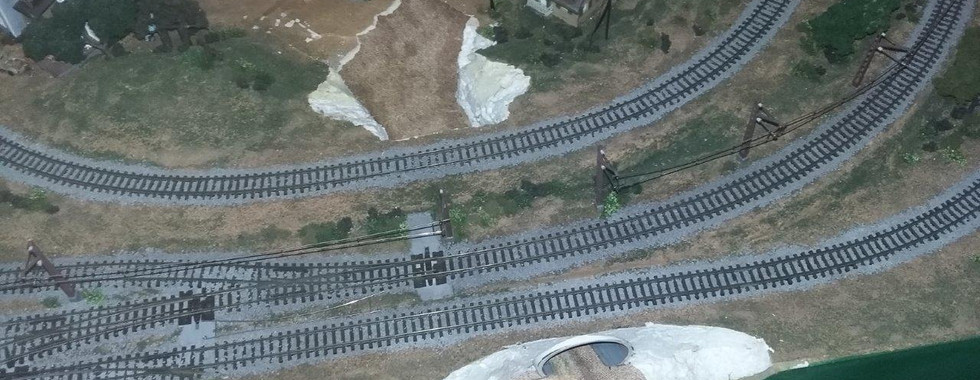
Step 7: Ballasting the Track


I use the Medium Light Grey Ballast from Woodland Scenics. I poured the ballast dry on to the center of the track, then with a 9mm soft brush I brushed the ballast with the track so that the excess spill over to the outside. This gives quite a natural look and the stones fall naturally. Then I test some trains just to make sure it is still OK. To fix the ballast, I mixed a mixture of water and a few drops of dish-washing liquid and used a eye dropper to apply it over the ballast. This helps to pull the glue to all the stones and fix it properly. To glue the ballast permanently I used the scenic cement from WoodlandScenics. You can also use a 50/50% mix of water and white cold glue
Step 8: Control Panel for the Layout and All Accessories
I started to add lights to the buildings and I also decided to add solenoids under the layout to switch the points. Now all this need to live somewhere on the layout and it must be easy accessible, so a control panel is needed.
I took some wood and built a frame with two sides, a shelve and a place to fit all the switches. Fitted it under the layout on a slider so I can hide it away if not in use. This worked well for a while. As things progressed it became impossible to manage everything so I decided to dump the panel and design something properly.
Old Panel......

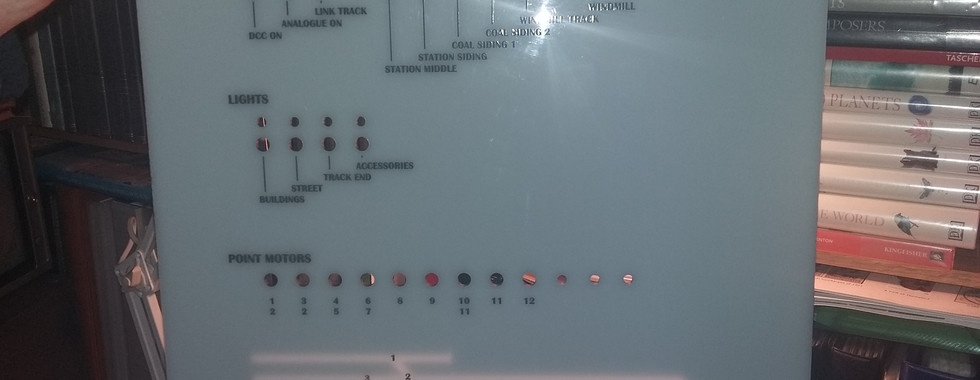
New and Improved Panel
I saw at a friends house what he did with Plexiglass and it really look awesome so I took it to the next level.
I designed a panel with the help of CorelDraw that will fit on the frame I already have.
Then I found a guy that can engrave all the labels for the different switches for me and he drilled all the holes for me too. Came out awesome. I then took black paint and painted all the text and polished the panel afterwards.
At the bottom of the panel I wanted to have the section of the layout where all the points are situated, so I masked the back and sprayed the panel black. I used the milky white Plexiglass for the panel.
Then I built a small light box and fitted all the wiring back, but much neater this time and I also thought about everything for maintenance and accessibility if something had to go wrong.
Much nicer and works 100% better.


Improvements: changes and or additions to the layout
“The idea is forming...”
I wanted to extend the layout to be able to run longer trains and also to have all the train facilities, like coal, sand, water a roundhouse with turntable and some sort of a factory like a saw mill. This meant that the trains as well as the town need to get off the layout and on to the extension.
Building a tunnel for the Town

Step 1: Getting the parts and the dismantling or excavation of the layout.


My dad came up with the great idea to use a piece of 50mm PVC pipe.
Awesome, measure, cut, make some ends from cardboard and cut the hole in the layout.
Fit everything to make sure it will work. Perfect and the track did not even had to move.
Step 2: Painting and building the tunnel.


Inside of the tunnel was painted grey and stained and weathered to look like concrete. I also added 3 LED lights.
Form cardboard I made pavings to fit either side of the road inside the tunnel. Road was also painted and weathered. This was fitted and glued in place as one unit to the layout.
Step 3: Painting and repairing the scenery around the tunnel.


I used creet stone to repair the landscape and once dry I painted the brown ground cover and add grass and bushes and trees from WoodlandScenics.
Great little project that made a big difference to the layout and it took me roughly 1 month to complete.


What a nice story to read. 45 years ago, when I was 17 had also a big Märklin H0 scenery. That stops when I leave the parents house. Now just discovered the Z scale. The new story can starts !